🐸案例:Ant跑马灯效果

🐸环境配置:
node --参照官网
yeoman -- npm install -g yo【-g 代表全局环境】
mendix pluggable widget --npm install -g @mendix/generator-widget
🐸开发前:
1,自定义Mendix项目文件夹下创建customWidget目录(名称不要求)
2,cmd打开至该文件夹
3,输入命令 yo @mendix/widget 你的组件名称
Widget name: {Your widget name}  //组件名称
Widget Description: {Your widget description} //组件描述
Organization Name: {Your organization name}   //组织名称
Copyright: {Your copyright date}              //版权日期
License: {Your license}
Initial Version:{Your initial version number} //初始版号
Author: {Your author name}                    //作者名称
Mendix App path: …/…/            //组件生成在项目文件下,自动生成
Programming language: TypeScript //选择Typescript
Widget type: For web and hybrid mobile apps
Widget template: Empty widget
Unit tests: No
End-to-end tests: No
4,vscode打开【组件文件夹】
>dist                //组件生成目录
>node_modules        //依赖
>src
  >compontents       //组件开发
  >ui                //样式文件
>组件名.tsx          //组件入口文件(数据流向)
>组件名.xml          //交互配置文件
>package.xml
>typings
  组件名Props.d.ts   //映射文件(交互配置)
5,导入ant design依赖,引用ui设计
vscode->终端->新终端,输入命令 npm install antd --save
🐸开发:
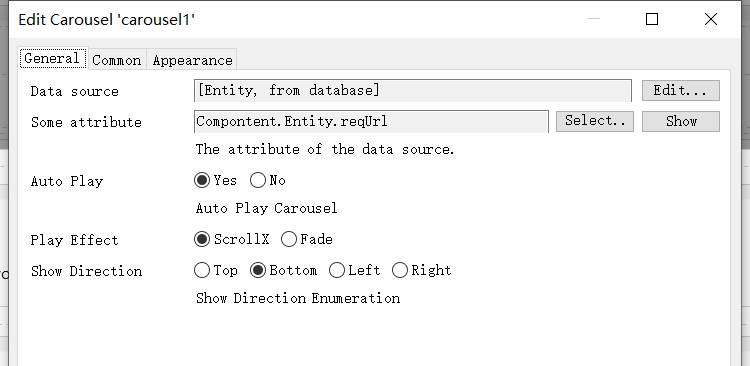
1,配置交互文件【仅供参考】,规则参考以下官方链接
https://docs.mendix.com/apidocs-mxsdk/apidocs/pluggable-widgets-property-types#action
-
数据来源于来源字段
-
是否自动播放
-
播放的效果
-
以及播放时的点状按钮方向
<propertyGroup caption="General">
            <!-- 数据来源 -->
            <property key="dataSource" type="datasource" isList="true" required="true">
                <caption>Data source</caption>
                <description />
            </property>
            <property key="attribute" type="attribute" required="true" dataSource="dataSource">
                <caption>Some attribute</caption>
                <description>The attribute of the data source.</description>
                <attributeTypes>
                    <attributeType name="String"/>
                </attributeTypes>
            </property>
            <!-- 是否自动轮播 -->
            <property key="autoPlay" type="boolean" required="true" defaultValue="false">
                <caption>Auto Play</caption>
                <description>Auto Play Carousel</description>
            </property>
            <!-- 轮播方式 -->
            <property key="playEffect" type="enumeration" defaultValue="scrollx">
                <caption>Play Effect</caption>
                <description></description>
                <enumerationValues>
                    <enumerationValue key="scrollx">ScrollX</enumerationValue>
                    <enumerationValue key="fade">Fade</enumerationValue>
                </enumerationValues>
            </property>
            <!-- 取样点存放方向 -->
            <property key="showDirection" type="enumeration" defaultValue="bottom">
                <caption>Show Direction</caption>
                <description>Show Direction Enumeration</description>
                <enumerationValues>
                    <enumerationValue key="top">Top</enumerationValue>
                    <enumerationValue key="bottom">Bottom</enumerationValue>
                    <enumerationValue key="left">Left</enumerationValue>
                    <enumerationValue key="right">Right</enumerationValue>
                </enumerationValues>
            </property>
        </propertyGroup>
2,运行命令,npm run build,将配置文件生成对应的映射
3,在入口文件,将参数代入
-
ShowIndex为初始的HelloWorldSimple.tsx改名
-
将node_moudles>antd>dist>antd.min.css复制到ui文件夹下面
import { Component, ReactNode, createElement } from "react";
import { ShowIndex } from "./components/ShowIndex";
import { CarouselContainerProps } from "../typings/CarouselProps";
import "./ui/Carousel.css";
import "./ui/antd.min.css";
render(): ReactNode {
return(
<ShowIndex
autoPlay={this.props.autoPlay}
playEffect={this.props.playEffect}
showDeirection={this.props.showDirection}
dataSource={this.props.dataSource}
attribute={this.props.attribute}
style={this.props.style}
/>
);
}4,ShowIndex.tsx文件
-
接口文件,用来做参数接收上游数据(Typescript强类型定义)
-
eles:any[],读取从mendix pro接收的列表数据
-
遍历数据,将数据作为参数引入,完成数据的显示
import { Component, ReactNode, createElement, CSSProperties } from "react";
import { PlayEffectEnum, ShowDirectionEnum } from "../../typings/CarouselProps";
import { ListValue, ListAttributeValue, ValueStatus } from "mendix";
import { Carousel } from "antd";
export interface ShowIndexProps {
autoPlay?: boolean;
playEffect?:PlayEffectEnum;
showDeirection?:ShowDirectionEnum;
dataSource?:ListValue;
attribute?:ListAttributeValue<string>;
style?:CSSProperties;
}
export class ShowIndex extends Component<ShowIndexProps> {
render(): ReactNode {
if(!this.props.dataSource || !this.props.dataSource.items || this.props.dataSource.status !== ValueStatus.Available){
return(
<div>Loading Data</div>
)
}
const eles:any[] = this.props.dataSource.items.map((node:any)=>{
const obj = this.props.attribute?.get(node);
// {"status":"available","value":"111","displayValue":"111","formatter":{},"readOnly":true}
return obj;
})
return(
<div>
<Carousel autoplay={this.props.autoPlay} effect={this.props.playEffect} dotPosition={this.props.showDeirection}>
{
eles.map(ele =>
<div>
<div style={this.props.style} className="widgetCss">
<img className="widgetImgCss" src={ele.value} alt="" />
</div>
</div>
)
}
</Carousel>
</div>
);
}
}
🐸使用
1,无报错后,运行npm run build进行打包,效果如下
2,作为跑马灯的效果主要为图片的轮播,在实体设计方面
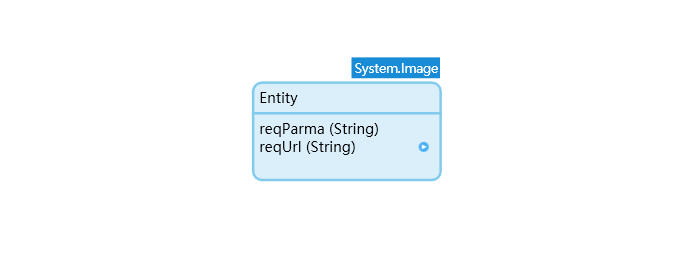
Entity(继承System.Image):
reqParam(主要参数),reqUrl(自动生成参数)
reqUrl主要为我们上传图片后获取到的可访问路径,如何处理请参考我的另一篇文章
Mendix - 有关于文件上传后获取文件路径解决方案
reqUrl的逻辑微流为【图片可用路径】+reqParam即可
💯💯💯有兴趣的朋友可以关注下公众号💯💯💯